Hack Pro (Late 2018)" build:Core i9-9900k - Z390 Aorus Pro - 64GB RAM - 2x Sapphire Vega 64

GIGABYTE Z390 AORUS PRO Motherboard
Intel Core i9-9900K Processor
CORSAIR VENGEANCE LED 64GB
2 x SAPPHIRE Radeon RX Vega 64
CORSAIR RM1000i 1000W Modular Power Supply
Rosewill CULLINAN PX Case
SAMSUNG 970 EVO M.2 2280 1TB SSD
Thermaltake Water 3.0 280 Riing CPU Cooler
2 x Thermaltake Riing 12 Series 120mm Fans
Sabrent Aluminum USB Audio Interface
FayTun 802.11AC 1200Mbps USB Wifi Adapter
Two 30" Cinema Displays
They never get old even when they get old
Two Apple Mini DisplayPort to Dual-Link DVI Adapter
Comments
I do a lot of motion graphics work, and my Early 2009 cheese grater Max Pro 8 core was starting to feel tired. I had been meaning to do the dual 6 core upgrade for a while, but I felt like building a new machine would be more fun and most of all- way faster!
This is my first build. So I really did not know exactly what I was getting myself into by buying components that had little exact use cases on the forum. But I trusted myself to be able to figure it out. Luckily, I succeeded enough to make a useful workstation. It wasn't without lots of troubleshooting, but hopefully the following directions make it simple enough to follow.
I wanted something simple, so I chose a very stripped down version of a motherboard, this one lacks Bluetooth, WiFi, and probably other bells and whistles you may find on other higher end ones. I wanted ease of installation though, so I was looking for compatibility out of the box.
Installation of the OS
At first I tried to install with High Sierra because I had initially planned to use two GTX 1080's and that limited me to HS. However after realizing that things would be much easier using AMD cards, I switched for Vega 64's which ended up being choice anyway. Then, I chose to do Mojave because I had read that installation was even easier.
1. Change BIOS Settings
• Save & Exit → Load Optimized Defaults
• BIOS → Fast Boot : Disabled
• BIOS → LAN PXE Boot Option ROM : Disabled
• BIOS → Storage Boot Option Control : UEFI
• Peripherals → Trusted Computing → Security Device Support : Disable
• Peripherals → Network Stack Configuration → Network Stack : Disabled
• Peripherals → USB Configuration → Legacy USB Support : Auto
• Peripherals → USB Configuration → XHCI Hand-off : Enabled (Extremely important)
• Chipset → Vt-d : Disabled
• Chipset → Wake on LAN Enable : Disabled
• Chipset → IOAPIC 24-119 Entries : Enabled
2. Prepare VegaTab_64.kext for AMD Vega GPU fan speed fix• BIOS → Fast Boot : Disabled
• BIOS → LAN PXE Boot Option ROM : Disabled
• BIOS → Storage Boot Option Control : UEFI
• Peripherals → Trusted Computing → Security Device Support : Disable
• Peripherals → Network Stack Configuration → Network Stack : Disabled
• Peripherals → USB Configuration → Legacy USB Support : Auto
• Peripherals → USB Configuration → XHCI Hand-off : Enabled (Extremely important)
• Chipset → Vt-d : Disabled
• Chipset → Wake on LAN Enable : Disabled
• Chipset → IOAPIC 24-119 Entries : Enabled
2a. Download and extract VGTab_en.zip from @pastrychef's build thread
2b. Open VGTab-en app
2c. Select Vega 64 (if this page comes up blank try reloading the app)
2d. Target Speed : 4900
2e. Target Temperator : 55
3. Prepare USB Installer with UniBeast for Mojave2b. Open VGTab-en app
2c. Select Vega 64 (if this page comes up blank try reloading the app)
2d. Target Speed : 4900
2e. Target Temperator : 55
* You can adjust all of these settings to your liking later, but this is what pastrychef recommended and it's what I use.
2f. Select Generate Control Information (this will output VegaTab_64.kext to your desktop)
3a. Make some minor modifications to USB EFI Partition using Clover Configurator
• Open USB Stick EFI Partition, navigate to EFI/CLOVER/
• Drag config.plist onto Clover Configurator app icon to open
• System Parameters → Inject Kexts : Yes
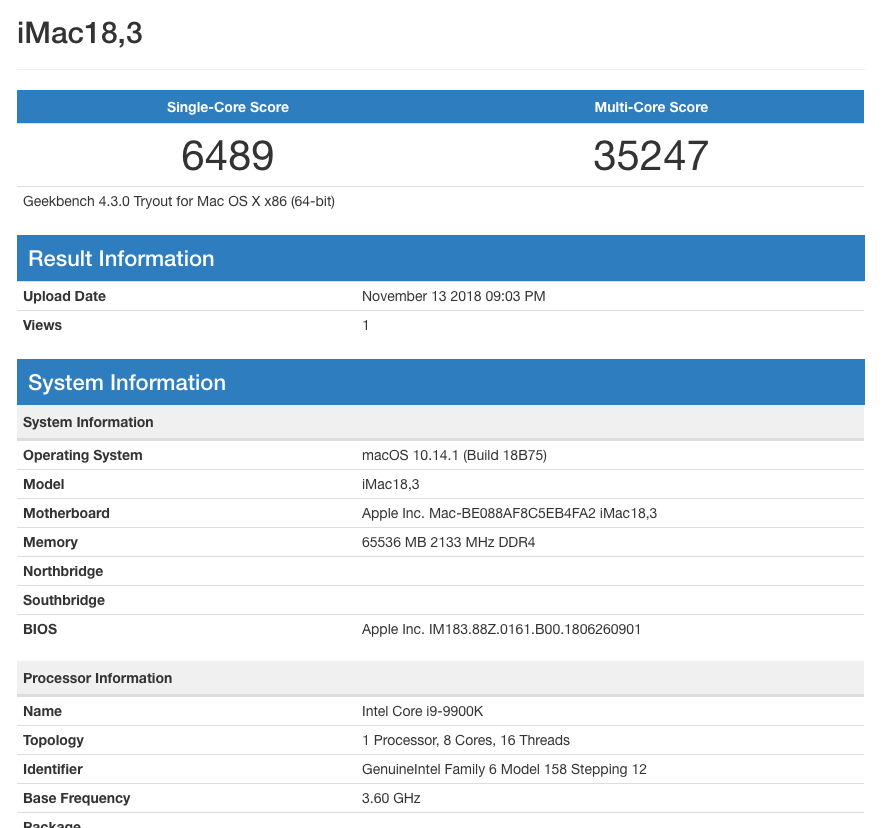
• SMBIOS → Product Name : iMac18,3 (or iMacPro1,1 but I am getting slightly better benchmark with iMac18,3)
• Boot → Verbose : Enable
• Rt Variables → CsrAcrtiveConfig : 0x67
• Close Clover Configurator, select "OK" if warning dialog for permanent volume storage
3b. Add a few kexts to the USB Stick EFI Partition → EFI/CLOVER/kexts/Other Folder• Drag config.plist onto Clover Configurator app icon to open
• System Parameters → Inject Kexts : Yes
• SMBIOS → Product Name : iMac18,3 (or iMacPro1,1 but I am getting slightly better benchmark with iMac18,3)
• Boot → Verbose : Enable
• Rt Variables → CsrAcrtiveConfig : 0x67
• Close Clover Configurator, select "OK" if warning dialog for permanent volume storage
+ Lilu.kext
+ Whatevergreen.kext
+ VegaTab_64.kext (the file output from VGTab_en app that we made in step 2)
3c. Create "Post Installation" Folder on your USB stick main partition and add a few things+ Whatevergreen.kext
+ VegaTab_64.kext (the file output from VGTab_en app that we made in step 2)
+ Clover Configurator app
+ FayTun USB 802.11AC Adapter Software
+ FayTun USB 802.11AC Adapter Software
4. Install Mojave
4a. Restart
4b. Hold F12 during BIOS to enter boot menu
4c. Select your USB Stick EFI
4d. When installer boots, enter Disk Utility and format "Erase" the SSD. Choose the recommended filesystem option (Journaled)
4e. Exit Disk Utility
4f. Install Mac OS X
4b. Hold F12 during BIOS to enter boot menu
4c. Select your USB Stick EFI
4d. When installer boots, enter Disk Utility and format "Erase" the SSD. Choose the recommended filesystem option (Journaled)
4e. Exit Disk Utility
4f. Install Mac OS X
* if computer restarts during this time, do not worry. Installation will take a number of restarts before completion. From here on out, select your main SSD hard drive during the boot sequence.
5. Copy EFI from USB Stick to Main Hard drive
5a. Open Clover Configurator on your USB stick main Partition
5b. Mount EFI → SSD → Mount Partition
5c. Mount EFI → SSD → Open Partition
5d. Mount EFI → USB Stick → Mount Partition
5e. Mount EFI → USB Stick → Open Partition
5f. Copy the entire contents from the USB Stick EFI volume to the SSD EFI Volume (Replace)
5b. Mount EFI → SSD → Mount Partition
5c. Mount EFI → SSD → Open Partition
5d. Mount EFI → USB Stick → Mount Partition
5e. Mount EFI → USB Stick → Open Partition
5f. Copy the entire contents from the USB Stick EFI volume to the SSD EFI Volume (Replace)
6. Post Install
• Install FayTun USB Wireless Adapter drivers
• Restart
• Restart
What Works
+ Graphics
+ Built in ethernet
+ Audio (with USB Adapter)
+ WiFi (with USB Adapter)
+ Sleep and Shutdown
What Doesn't Work
– On-board audio
– Bluetooth (I don't have BT hardware, not needed though)
– DRM (I don't buy anything from on iTunes/App Store so no way of testing this)
– Thunderbolt (I really want to add this somehow)
To Do (I may need some help here)
• Audio Device recognition
• MultiBeast settings for automatic boot process
Final Thoughts
I still have some things to maybe correct and there are still some things untested. I am not sure if USB 3 works all the way, but for the most part this machine functions for what I need it for (which is a 3D animation & motion graphics workhorse). Audio sounds great through the USB audio adapter and took no software installation at all. The Vega 64's are behaving wonderfully and I am getting some great numbers in all benchmarks. No crashes, no hangs, and no failed boots to report with the system configured as shown.
I am super happy with this machine. I took me very little time to build considering this was my first build and first hackintosh project. Super thankful to all of the other contributing members here on these forums who made this a fun learning experience that has already been super rewarding.
Benchmarks (stock, no overclock)


1 Comments
Lucky Club | Play £10, Get 30 Free Spins No Deposit
ReplyDeletePlay for £10 and get 30 Free Spins luckyclub.live No Deposit, a Welcome Bonus. Use this code: DUSTBET. Lucky Club Casino no deposit bonus: 50 Free spins on